This is default featured slide 1 title

Go to Blogger edit html and find these sentences.Now replace these sentences with your own descriptions.

This is default featured slide 2 title

Go to Blogger edit html and find these sentences.Now replace these sentences with your own descriptions.

This is default featured slide 3 title

Go to Blogger edit html and find these sentences.Now replace these sentences with your own descriptions.

This is default featured slide 4 title

Go to Blogger edit html and find these sentences.Now replace these sentences with your own descriptions.

This is default featured slide 5 title

Go to Blogger edit html and find these sentences.Now replace these sentences with your own descriptions.

Thứ Tư, 27 tháng 4, 2016

How to send encrypted email through Gmail on Chrome

Extension of the (extension) free Google Chrome has allowed us to be sending encrypted email from Gmail to other email services. Then you need to send an email containing sensitive information? Every email sent in the usual way are at risk of being blocked or "hack" before it reaches the recipient.

To prevent this, you can use an extension (extension) Free for Google Chrome called SafeGmail. SafeGmail that allows you to send encrypted emails.


Meanwhile Email is encrypted and decrypted in the browser, so just you and the recipient can see the message body. To ensure confidentiality, email encryption continues to suffer in the outbox of the sender and the recipient's inbox. Email will also automatically expire after a random period of time.

You can use SafeGmail to send email from your Gmail inbox to recipients using any public email services, including Gmail, Yahoo! Mail ...

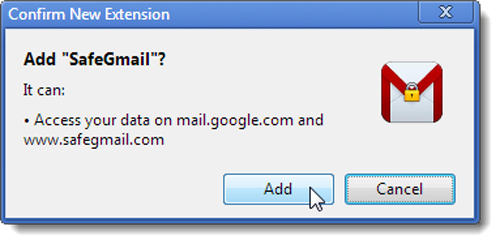
To install this extension, visit SafeGmail extension, click "Add to Chrome".


When the dialog box "Confirm New Extension" appears, click "Add" button.


After the installation is complete, then a message box will appear. Restart Google Chrome and reopen Gmail page.


You'll have more choice SafeGmail "Encrypt?" In the drafting of the Gmail screen. After you have finished writing the email and enter the recipient's address as well as email headers, select the checkbox next to "Encrypt?", Will appear two box "Question" and "Answer". Enter a question and answer validation that only you and the recipient is known. Click "Send + Encrypt".


Email is encrypted when transferred to the recipient will be shaped like the picture below, the line between the two dashed lines is a line of characters including letters and digits. Copy the characters before clicking on the link "Here" in the "Click Here to access the mail content."


Answer the confirmation and click "Submit" to access the screen that allows decoding email


Mail Decryption screen pops up. Paste (paste) copy of text into the box and click the "Show My Mail".


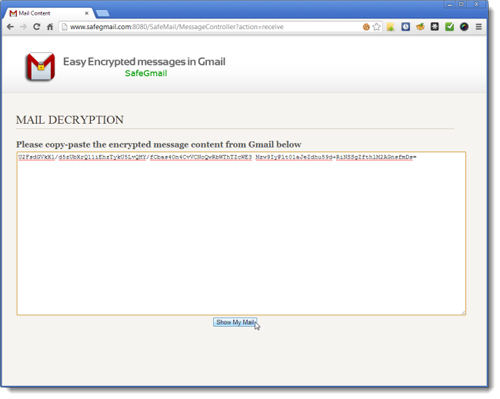
The content after decryption message displays in the browser window.

SafeGmail also allows you to enter special characters language in email encryption needs.


Thứ Ba, 26 tháng 4, 2016

Configuring Windows Mail with IMAP

To work with Windows Gmail customers need to set the following steps.

1. In Windows Mail. Wizard pops up if it's your first time you use it; otherwise, simply click Tools> Accounts> Add.

2.  Enter your name, then click Next.


3.  Simply enter your email address complete your RH Smith (username@rhsmith.umd.edu), and you press the Next button.


4. You select the input for IMAP server, and then you check 'Outgoing server requires authentication; Click Next.


5. Enter your complete address, email RH Smith (username@rhsmith.umd.edu) and Google password, and click Next. Please see picture below to know more.


6. Click on the ray (the checkbox is optional), then you click Finish.
7. You Choose Tools> Accounts> IMAP account, then select Properties> Advanced.
Enter port number '465' next to 'Outgoing Mail (SMTP), and port number' 993 'next to' Incoming mail (IMAP) 'field. Check both secure connection boxes, and click Apply.
Click Close.


8. Check Google's recommended client settings, and adjust your client's settings as needed.


See more : 
Add an account to Gmail

Thứ Hai, 25 tháng 4, 2016

Add an account to Gmail


When you open the Gmail app, when you open up and then you will read her, and you can send messages from all your email addresses, even if they are not a Google Account. If you do not have gmail account, you should download the latest version of the Gmail application, please follow the steps below.
Add an account
When you are using a gmail this already, but you do want to log in with a different Gmail, but you also do not want to log out the Gmail account that you used. When it is you're adding more .As an account then you go follow the steps below
1.  First you open the Gmail app.
2. At the top left, you tap the Menu icon.
3 .At the top, go to the right of your user name and hit the down arrow.
4. Click Add Account.
5. And then you enter the account you want to add to that


Google: Gmail or Google for a work address.
Personal (POP / IMAP): An email address that is not from Google, like Yahoo or Hotmail.
If a business address that uses the Microsoft Exchange server. If you are unsure if your company uses Exchange, check with your IT department. This option is available for Nexus devices and some Android 5.0+ others run

6. You follow the above to add your account.
If you ever encounter a problem adding e-mail addresses that are not from Gmail, you can check for other instructions on the support site of your email provider. Here are tips to help you perform a Google search for the word "POP" or "IMAP" along with the name of your email provider
To switch between accounts
  The message on the Gmail app it is in a separate account for each individual differently. To switch between accounts to be able to see the message:


  • Please Open the Gmail app.
  • At the top left, touch the Menu icon Menu.
  • Next to your email address, tap the down arrow.


  • Please cick o account you want to use.


See more : 

Thứ Năm, 21 tháng 4, 2016

2 hidden ways to get more from your Gmail address

New Recently we have discovered some little-known way to use up your Gmail address that you can give you better control over your inbox and it can help you save time and be more and not get a headache. When you select a Gmail address, you really get is "your username@gmail.com." In Here are two different ways you can change your Gmail address and still receive your mail:

Please add one plus sign ("+") sign and any combination of letters or numbers on the drop email address of the friend. Example as, name of you is Hikingfan you not set like this: hikingfan @ gmail.com, or you send mail to hikingfan+friends@gmail.com cũng or hikingfan + mailing lists@gmail.com.
Insert one or one of the dot (".") Wherever in the email address of you. Gmail not recognized companies in the period like names addresses - you just ignore it go too. Example as, if you can tell everyone of you is hiking@gmail.com address, or hi.kin.g.pan@gmail.com hi.kingpan@gmail.com. (We would understand the wrong one existing có lẫn about this of you, but to settle it once and được mà thing for all you Actually im possible to receive emails out all variants with the dots.)


For us, the actual value in being able to manipulate your email address is that it makes it very simple to filter it out of the variations. For example, you can use when you sign up for hikingpan+bank@gmail.com online banking and then set up a filter to automatically backup and store your email address or label to hiking + bank groin. You can also use when you register for the service and I think they may share your information. For example, I added "+ donation" when I give money to a political organization once, and now when I saw the email from other groups to address, I know how they did get it. Solution: filter to automatically delete.


Gmail app for Android: 7 cool tricks you must try

Email is now an indispensable application in the modern age of each of us. Among all types of email, Google's Gmail is a good selection of people and most people now use it only for the simplicity and convenience of it. However, there are some tips for you to use Gmail gmail for your job becomes easier, but it seems most people apparently do not know it
But first, make sure your smartphone is running Android your latest version of Gmail. So you can do this, go to the Play Store and check that Gmail has a new version, and if you tap on Update to download and install the latest version on your phone. And then later, you can apply some tricks that g.mailsignin.org shares following our question


Merge multiple accounts into one inbox

If you have multiple Google accounts, whenever you want to check another email account, you must log out and then log in to Gmail again. This is a very annoying your right. That is why Google adds Gmail inbox combination. This latest version of Gmail that allows you to view your inbox multiple accounts at the same time and the same browser.


To be able to use this utility, you can add a new account to the menu on the left, just below your avatar. After you sign the proper credentials, all the messages sent to it will appear soon in a public mailbox in the left menu allows the information to be viewed by all of the same mailboxes for a while. However, if you want to see an individual mailbox, and you can switch between accounts by dragging your cursor down to the menu in the top corner.

Quick manipulations


The latest version of the Gmail app for Android, you can simply and quickly favorable. For example, if you want to retain messages, you can simply swipe left or right, or select more than one message by tapping on the image represent different letters each


When a message is selected in this manner, some actions will be appearing at the top of the screen as Archive, Delete, Mark as read / unread. Another option that can be accessed from the menu (an icon with three vertical dots). Go to a specific conversation to choose answered and answered all at the top - right corner of the screen.

Sync messages

You will not receive new messages if your message is not synchronized correctly. To synchronize data, go to Settings, and tap Accounts. And now you'll see the account associated with your device, tap an account to enable syncing.


In the Gmail app, visit the Settings menu, then click the email address to which you want to set up the synchronization. In that case, you can set how many days you want it to sync your messages. If you have problems syncing, try to disconnect that account, and then reconnect. If the problem can not be resolved, you should uninstall and reinstall the app.

Smart Search
The search feature in the application may look simple, but in reality, it is not as easy as you think because it is almost similar to the site. For example, enter "older_than: 1Y" or "older_than: 1d" into the search box to find old messages for 1 year or 1 day in Gmail.


Google provides a list of search keywords in the Gmail app as well as on the website. For example, type in "is: important", it will give you the results of important messages, or "is: starred" to identify letters with asterisks 

Mute Feature

when you're on the road, if you have a notification of new messages, you must open it up to check mail immediately, but this message is not important to you, which is very time-consuming and inconvenient. This problem Google has added a new feature to open web Mute as Gmail app. Messages from senders you selected will not be notified when a new message, however, these messages will be automatically stored in your inbox, and it will be marked as unread .


In order to activate the Mute mode, press and select the message, and then touch Menu to another (three vertical dots), then it will show us a list of your tasks and select Mute . That feature has been enabled. You can still view the messages in the Archive by searching or filtering through the label message.

Auto-advance feature

Auto-advance is a function really of interest to you having to work with multiple messages simultaneously. With this feature will help you all the time savings when storing or deleting a series of letters, the app will not come back again, but that is the mailbox automatically navigate to the next message.


If you want to enable this feature in the Gmail app for Android, go to Settings, then select General Settings, then touch Auto-advance. This time, the screen will display a dialog box that allows you to select the application to be transferred to the new messages, old messages or back to the message list.

“Guide” Gmail to sort mail

Gmail has many mailboxes to classify different types of letters as personal mailbox, inbox, spam ... However, sometimes, some spam still go into your personal mailbox . In order to remedy this situation, you can see the "guidance" to sort mail Gmail.


If you see an important letter is sort of place that you want, you can order settings (three vertical dots) on the right corner of the screen, then select Mark as not important to you . If you see an important message to the spam mailbox, you also do the same as above: in the Settings menu, select Mark important, or not spam report. From now on, Gmail will a similar classification accuracy.


there are 7 tips in the Gmail app for Android devices. .mailsignin.org hope with this procedure, your work will become more convenient and much faster benefits


How to login multiple Gmail accounts at the same time

Sometimes you will have a lot of Gmail accounts, so sometimes it makes you difficult to log in to all of them at the same time. Gmail lets a person can register several different accounts. But, in the normal way, you just need to log in to a Gmail account on the web browser you are using.

Provisions of Gmail, you can sign up for Gmail with unlimited amounts - a person can register and how much property they desired Gmail account also. However, when you have multiple accounts, you will find it very difficult to account login to check e-mail on multiple accounts at the same time, sometimes you will have to log out and then back it out in many times like that, or even to install multiple browsers at the same time, each browser to each Gmail account, then you will feel quite uncomfortable.

So, today, we will introduce Choi you about how to register and how to login multiple Gmail accounts at the same time and also in the same browser. Note that if you do not have t any Gmail account, then please visit this link and sign up for Gmail as an introduction:

From 1: Log into 2 Gmail accounts using incognito mode


Using your browser’s built-in incognito combinated with private-browsing mode can help you to log in 2 Gmail accounts at the same time.
With Google Chrome browser, you can log the incognito mode by opening your browser and press Ctrl + Shift + N
With Safari Mac OS, you can press the up arrow key + COMMAND + N
With Mozilla Firefox and Internet Explorer, you log the incognito mode by opening your browser and press Ctrl + Shift +


From  2 : Log into multiple Gmail accounts using many different Web browsers

With the web browser opens up like that, the Friends logged by a Gmail account, therefore, the web browser bạn, as you sign in with multiple Gmail accounts,
Here be a number in the most popular web browsers:

Google Chrome
Safari
Mozlla Firefox


 From 3: Sign in multiple gmail accounts in the same browser

In the first place, you enter the first Gmail account as usual. Once successfully registered, then you click on the icon in the top corner of your account on the right, and then you will see next box containing your account information such as name, email address, logo, ... then you look at the bottom of the box and you'll see the Add account (as shown below). You click on it and you'll be able to log in to another Gmail account. And so you log in to add a different account that you want to sign it added


By the time you use Gmail, if you do want to switch to any other e-mail, simply click on the icon of your account to Gmail will show you the list of the Gmail account that you signed import. Select the email that you want to log and Gmail will automatically log in to the server for you. So, from now on, you can log multiple Gmail accounts in the same browser without having to log out and log in again and again.