This is default featured slide 1 title

Go to Blogger edit html and find these sentences.Now replace these sentences with your own descriptions.

This is default featured slide 2 title

Go to Blogger edit html and find these sentences.Now replace these sentences with your own descriptions.

This is default featured slide 3 title

Go to Blogger edit html and find these sentences.Now replace these sentences with your own descriptions.

This is default featured slide 4 title

Go to Blogger edit html and find these sentences.Now replace these sentences with your own descriptions.

This is default featured slide 5 title

Go to Blogger edit html and find these sentences.Now replace these sentences with your own descriptions.

Thứ Hai, 13 tháng 6, 2016

Login with Facebook by Email, phone number

Login with Facebook email is the traditional method that the majority of users still use. Will not matter if we logged in to Facebook on a computer or laptop. However, if you use the phone, it is quite cumbersome and time consuming, because you will have to enter these special characters from email.

In addition to more convenient and offer Facebook login option 2, which is the Facebook login via telephone. Refer to the steps below for further details. On the other hand, if not clearly refer logging via Facebook by mail fir

-------------      How to Log Into Multiple Gmail Accounts on the same PC   -----------------

BY MAIL ON FACEBOOK LOGIN

Step 1: From the browser visit facebook.com address


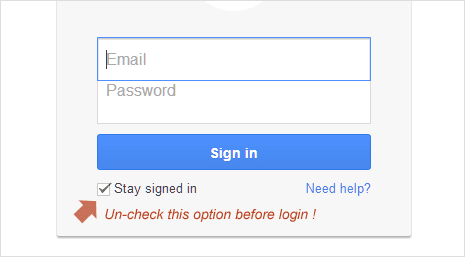
Step 2: There will display the log frame, you should note the following.

Email or phone number: This is where you will enter your email address or your phone number. In case of no account, please refer to the article by registered Facebook that we have previously provided.

Password: Enter your password when registering.

Maintain log: When a checkmark in this dialog box, you do not have to enter your email and password in the next time.

Then click the Login button to continue access. In the absence of access Facebook, it is likely your password entered incorrectly. Now you need to verify your password.

LOGIN WITH FACEBOOK PHONE NUMBER

Step 1: From personal Facebook page to go to the Settings option. Next to move through the Mobile tab. Here you'll see the Add button


Step 2: After you click on the Add a phone, a window will show up with two main information.


Country / Region: Country where your packages are active network

Mobile Carrier: Select the network you are using. Examples here I choose Mobiphone.

Click Next to continue.

Step 3: On your phone go to messaging and texting to send 32 665 F content.

Facebook will respond to the confirmation code via text messages to you.


Your task now is to enter the confirmation code in the box.


Step 4: Quit Facebook by clicking the down arrow and select Log Out.


Step 5: Go back to the login page. Now you can login with Facebook your phone number and know.


See more  :    How to backup your Gmail account


Thứ Sáu, 10 tháng 6, 2016

How to backup your Gmail account

There are many reasons why you should think about Gmail backup (data archive Gmail account) in the process of using a Gmail account or a Google Apps account. Here Vietnam Nis will teach you how to back up and recover a Gmail account, Google Apps when needed.

Currently Google has developed a tool called: Takeout, aims backup for Gmail applications including Mail, Bookmarks, Calendar, Contacts, Drive, Hangouts, Blogger, YouTube, Google Play Books . All applications are backed up, and outputs the most popular formats available today.
Private applications are most interested in the problem that backup Gmail account Mail. With the output to MBOX format quite common and convenient for the recovery (see below how to recover). The limit is 2 GB of backup files for each backup file. You can back up each application, each application for each file. Here are detailed instructions:


1. Go to your Account Manager

Tools can be found at Takeout: Accounts> Data Tools> Download your data. You can go directly to this link or Takeout through this link if you just want to backup mail. You will see a list of applications that allow backup. Next you will select the application you want to backup.


2. Configure option to create copy

Each application will have different options corresponding to that application. Below are two options typical of Letters and Calendar


Google has developed the backup application under Labels to help users with the appropriate options for the Create copy selectively. After selecting the option to complete the application and you go to the next step.

The store will give you the option of compression format (3 types) and 2 options on how to save and load:

  1. Send download link via e-mail
  2. Save the file in Drive so you can download it later.


3. Wait for the file system creation


Creating a system file will be created automatically and notify you when completed. Time for the backup will correspond to the amount of data you back up.

4. Download the file from the Google store

When mail has been created, you can download it via the link are sent or drive, depending on your preference above. In addition you can also check the records you created in this link. You can choose to download or delete it at any time.


When you unzip the download file you will get the backup files in standard format to serve the restoration work.
How to restore and .ics file .MBOX Gmail account?

With .ics file you manipulate: Calendars> Settings> Calendars> Import Calendar / Calendar> Options> Calendar> Import Calendar.
For .MBOX file, you can upload to Gmail in many ways. One way is to use Mozilla Thunderbird mail client (can do the same with Microsoft Outlook). After configuring IMAP for Thunderbird, you install the Add On: ImportExportTools as shown below.


Extension on you can find at this link. You can also set manually, not through search engines by clicking the Install Add-on From File ... to select the downloaded file extension as shown below.


After installing and restarting Firefox go to: Tools> ImportExportTools as shown:


Select a folder any folder in the Local inbox. Right-click, select Import from file Mbox choose option number 2, select the mbox file to import (Note: mbox file name must be consecutive string without quotes).


Perform additional configuration Google Apps account / Gmail to Outlook using IMAP port.

At the local directory has import Mbox file above. Select all messages> right click> Copy to folder> select the folder you want to sync up Google Apps account / Gmail.


Thứ Tư, 1 tháng 6, 2016

Top 10 Gmail Firefox Add-ons


There are many different browsers available, but Firefox has some most interesting plug-ins that work well with Gmail. This shows that you should have a different perspective on Firefox before completely abandoning it for other web browsers.

Firefox Add-ons for Gmail


there are many add-ons various Firefox that is perfect for Gmail. Choose from hundreds of add ons is a difficult task. We've narrowed the list down to 10 in the Firefox Add- ons must have for Gmail.

1. Gmail Notifier
With add-on, you can receive notifications on your desktop whenever you receive a new email in your Gmail account this.

2. Powerbot for Gmail
This will allow you to add Evernote integration into your Gmail. These add-on gives you a way to insert any of your Evernote notes or laptop with a Gmail e-mail easily.

3. Integrated Inbox for Gmail and Google Apps
If you are using mostly free applications available on Google, which added to your Firefox browser allows you to see all of it in a flash through your Gmail inbox.

4. Google Shortcuts
If you want easy access to your Gmail without having to type the URL of the login page to the browser, this is the perfect gadget for you. It provides one-click access to Gmail, but not only with other Google services as well.

5. Hello Sign for Gmail
This added will give you an easy way to open any attachments from your Gmail as well as edit and sign.

6. PowerInbox
If you want to integrate social media your Gmail inbox, you can do so with PowerInbox settings for your browser Firfeox.

7. Gmail management
You will be able to manage multiple accounts with this added as well as receive notifications when new messages received in your Gmail inbox.

8. Email Yourself!
This utility will allow you to email it to yourself through Gmail link of any site you're viewing along with the title and a brief summary.

9. Gmail Settings
With add-on, you will no longer have to open a separate tab to check your Gmail this. With a click of a button a panel with your Gmail inbox will be made available to you.

10.Unread Gmail Favicon
You will easily know how many unread emails you have in your Gmail inbox. This Firefox add also allows you to be notified on screen when a new message arrives. This will help you keep track of all your emails easily.
 

SEe more  : 5 Reasons Why Gmail is the best

Thứ Ba, 31 tháng 5, 2016

5 Reasons Why Gmail is the best

Below you will find 5 reasons why Gmail is the best application.


1. Easily Create email

Gmail has made it easier than ever to compose email. Simply click the "Compose", and a small window will pop up at the bottom right of your screen. Because it is a separate window, you can browse through your email and take care of other tasks without losing your Gmail compose your email.

And Gmail automatically saves drafts your email. If you accidentally close your new email, you can start right from where you left off without having to retype the message from the beginning.

2. Call, Video Chat or Email


Forget having to use multiple programs to chat with friends and family. Gmail allows you to send emails, instant messages, phone calls and video chat with your contacts. And with Google Hangouts, you can hold virtual meetings for up to nine people right from your email. Share your screen, watching a video together or just chit chat. Gmail makes it easy to communicate the way you want, when you want.

3. Your Inbox - your way

Gmail offers you a multitude of organizational tools to customize your mailbox at your own way.


  • Create labels to quickly sort your messages. You can add more than one label per message, too. And the color of the labels make it easy to find what you want quickly.
  • You want to group together similar emails? Using filters. Simply set the standard for your filters, and Gmail will automatically filter and sort your messages.
  • Choose a theme for your email to give personality to your inbox.

4. Save time

With Gmail, you have lots of ways to make work your inbox for you, so you spend less time sorting through email and get things done time.


  • Snippets show you the first line of the email, so you can decide if it's urgent enough to open and read immediately.
  • The shortcut allows you to complete the task at lightning speed. There are dozens of keyboard shortcuts in Gmail, so you can start being more productive immediately.
  • Background sending allows you to send email without disrupting your current job.

No longer do you have to waste your time sorting through emails by hand.

5. Priority Inbox

One of the best features that Gmail offers its Priority Inbox. Every day, you're bombarded with messages from the stores you shop at and notifications from your social accounts. In the early days, the last thing you want to do is sort through emails and distracting nonsense.

Gmail splitting your inbox into three tabs: priorities, social and promotions. The first tab (priority) is where all your important messages are sent. The social tab contains all your social notifications, while the Ads tab contains the promotional emails from stores and businesses.

If you do not use Gmail, now is a great time to start. With easy way to sort, organize and compose email, it's no wonder the email system Gmail is favorite for millions of people around the world.

See more :  
How to automatically delete emails Old Spam in Gmail

Thứ Tư, 25 tháng 5, 2016

How to automatically delete emails Old Spam in Gmail


What would you do if you receive a lot of spam? The best way to clean up your inbox is to make it to Gmail automatically deleting old spam for you. And
Post below our will introduce you how to how to automatically delete old email in your Gmail cause of product. And then you never have to see this message if you do not want.
You must first log in to your Gmail.


How to automatically delete emails Old Spam in Gmail

There are a few different ways you can automatically delete old spam messages from your Gmail account.

Create a filter


Google warns that the filter can not work as intended when trying to send spam messages to the trash. But many people have had success with this method. Here's how to automatically delete your spam.

  • Click the gear on the right side of your inbox, and click Settings.
  • Click the Filters tab, and click the "Create a new filter" link.
  • A pop-up box will appear. In "These Words", enter "in: spam" without quotes.
  • Click "Create filter with this search," and then click okay to confirm.
  • Click "Clear It" to send spam to the Trash.
  • Click the check box next to the Create Filter button to apply this filter to any spam messages already in your spam folder.
  • Click Create Filter.

This will remove any old junk mail you have in your folders, and automatically remove any spam you receive in the future.

Wait 30 days

If you do not want to create a filter or filtration methods are not 'working for you, you always have the option to just ignore your Spam folder for 30 days. Gmail automatically delete spam messages after 30 days, so you do not need to delete them manually.

Google recommends simply wait for Gmail to automatically delete your old messages for you. Filters can be a hit or miss, so if you're not in a hurry to remove from your Spam folder, you can wait a month for the message to disappear on their own .

Use the "Delete All" feature (not automatically)

Is there a way to get rid of all your junk mail, but this is not an automatic method (techniques).

When you click on your Spam folder, you'll see a notification at the top of your inbox. Inside of that message is a handy link will delete all your spam with just one button press. It may not be an automated way to get rid of spam in your inbox, but it's a quick way to delete these messages if you do not want to wait 30 days or masking technique is not made work for you.

If your inbox is filled with spam and you can skip your folders in a few weeks, it is best to let Gmail automatically remove junk mail for you. But if you need to get rid of spam today, one of the two methods will solve your problem

See more  :  


Thứ Sáu, 20 tháng 5, 2016

How to delete name on Gmail Sign-in page from previous login

Google has introduced a new unified login page for all Google services. Irrespective of which Google services you log on as Gmail, Youtube -. It will redirect you to the new Google login page account of how one is my login name, profile photo, email & ID is visible on the Gmail Sign-In page even after I had logged out ? This has puzzled and worried many users Gmail when many users do not want to see the email ID, profile picture and record their name after signing out of your Gmail account and sign in to your Gmail account or other Google.
Disable 'auto login' to fix the problem logging in to Gmail
This problem is a result of "automatic login" feature is enabled by default whenever you log in to Gmail or Google account. Gmail login details / your previous Google will appear on the login page after logging out as seen in the image below.


1. Open Gmail or Google account login page url accounts.google.com. Enter your email username and password on the login page.


2. Uncheck the option Stay logged (no mark beside this option). Then click the Login button to large logging into your account. After the sign you will see the same login page but no detailed account of your previous login name, profile picture and email ID.


3. If you do not uncheck the "stay logged in" option, the login details will appear on your previous Google Account login page. You can also manually remove it by clicking on the "sign in with another account" at the bottom. Then click Remove button, click the X next to the account are listed and finally click the button done.

See more  :   

Thứ Năm, 19 tháng 5, 2016

How to Block Email address through Gmail


On each day you encounter any spam email, then you feel the trial, you feel cluttered inbox view by the mailbox that sense. Actually it is very simple so you can easy to ignore and delete it go too, there are some cases when it's better to simply block the sender to stop the emails from landing in your inbox you.

If you're using Gmail, you may be surprised to find that there is no real way to "block" email address. Your only option is to send email from that person to your junk mail box automatically. Fortunately, Gmail makes it easy to . Here we will introduce to you how to block email address through Gmail.

How to lock an Email Address via Gmail


To block an email on Gmail, follow the steps below:


  1. Log into your Gmail account.
  2. Open an email from the sender you wish to block. If you have a lot of emails in your inbox, you can use the search box at the top of the page to search for the person’s name.
  3. Once the email is open, click on the down arrow on the top right side of the message (next to the quick reply button).
  4. Select “Block (Sender’s Name)” from the dropdown list.
  5. Gmail will ask you to confirm the action. Click the Block button to continue. You’ll notice that the dialog box says all incoming emails from that sender will automatically be moved to your Spam folder.


Now, each time being in breach'll send you an email, it will automatically be moved to the Spam folder. This way, your inbox can never be filled with unwanted email. When you're ready to get rid of these emails, simply empty the Spam folder.

Email addresses are not blocked

What happens if you block an email, and then regret your decision? Gmail makes it easy to unblock users, too. Here's how:

  1. Log into your Gmail account.
  2. Click the gear icon in the upper right of your inbox.
  3. Select Settings from the drop-down menu.
  4. Click "Filters and Blacklists" tab.
  5. Locate the sender wants to unlock, and click "unblock" link.


Mark messages as spam or phishing

Gmail do our best to filter out incoming spam, but some messages will be passed over time. That is why Google has made it easy for Gmail users to mark messages as spam. Therefore, it also helps Google improve its algorithm and block similar messages in the future from landing in your inbox.

Here's how to mark messages as spam:

  • Log into your Gmail account.
  • Select the message from the sender violations.

Now, there are two ways to mark a message as spam
  1. Click the down arrow on the right side of the email (besides the quick reply button). Select the "Report Spam."
  2. Click the "Report Spam" at the top. Find button with an exclamation point in the middle of a stop sign.

Also, if you receive an email requesting your personal information, you can report the sender to fraud and helps Google identify similar email.

To report a message:

  • Log into your Gmail account.
  • Select the message from the sender violations.
  • Click the down arrow on the right side of the email (besides the quick reply button). Select "Report phishing."

Block email from shopping sites, social networks and similar sites

If you receive unwanted advertising messages and similar messages, you can block future emails from entering your inbox by unsubscribing from the email list.

To do this:

  • Log into your Gmail account.
  • Open the offending email.
  • Click on the "Unsubscribe".

Without the "unsubscribe" link, finding a link "Change Preferences" to remove themselves from the list. If neither of these options are available, you can block the email address using one of the methods listed above.


Thứ Năm, 12 tháng 5, 2016

How to forward email in Gmail


Although Gmail is a great free service of email, but at a certain time that you want to forward the message to another account. For example, if you want to move all messages from your Gmail account to your new email address automatically. Here we will introduce to you how to turn your Gmail inbox into another mailbox.

Forward all email from Gmail


If you want to forward all emails from Gmail, here are steps to guide you forward, and you need to follow it. Note that Gmail will not notice that it is automatically forwarded message is spam, so you may still need to check your account from time to time, in case there are some important messages not be sent to your new email address.

Step 1 Enter email forwarding address

If you just want to send all of your messages from Gmail to another email account, you can do this easily. Go to your Gmail Inbox using a web browser and click on the icon at the top Cog right of the page, then click Settings. Click the Forwarding and POP tab / IMAP and click Add a forwarding email address. Enter the address you want to send all e-mail and click Continue, then click Continue again.


Step 2: Enter the verification code
At that Gmail will automatically send you a confirmation email to the email address that you specify forwarding, so you will need to check this address to your message. When you have it, you can click on the link in the email to automatically verify your email, or you can copy and paste it into the box in Gmail, Settings, Forwarding and POP page / IMAP. Once you've verified your account, you're ready to configure the relay.


Step 3: Transition Configuration

Once you've verified your account, Gmail will not automatically forward emails; instead, you need to tell it how to work forward. Go to the settings page of your Gmail account and return to the tab Forwarding and POP / IMAP. Now you can select the 'Forward a copy of incoming mail to <email address to verify your>'. You also need to work out what to do with that email came into your Gmail account. The default is to keep the message, but you can choose to delete, archive, or mark it as read. Click Save Changes at the bottom of the page when you're done and your email will start to be forwarded.


STEP 4 : Disable forwarding

If you no longer want to forward của emails, go back to the settings page and select Disable forwarding. Click Save Changes to confirm the change. You can remove của am also forwarding email address verified. Use the drop-down menu after "Forward a copy of incoming mail to 'to select the Remove option for your email. Click OK to confirm the change.


Forward specific email from Gmail

If you just want to send specific emails from your Gmail account to an email address, here are the instructions you need to follow. All e-mail that does not conform to the rules will be for you to configure your Gmail inbox. You will need to have created a forwarding email address, by following the steps below.

Step 1 Create a filter

Once you've verified your email address (as above), you can go to Settings (click the icon Cog), the Forwarding and POP / IMAP. Click the link to create a filter in the Forward and you will get a dialog box to fill, which will search emails matching your criteria. This can include messages from, it was, subject, word in itself, plus view attachments and the size of the message. Once you have filled in the data, you can click the Search button to verify the email list that you want to be forwarded. Click Add, Create Filter and you can modify the search results, or you can click Create filter with this search to sort out forwards.


STEP 2 Select forwarding address

In the Create Filter dialog box, put a tick in the Forward it to box and, from the drop-down menu, select the verified address that you want to send matching messages to. Click Create Filter and the new rule will be created: when you get an email that matches your search criteria, they’ll be sent automatically to the email address that you selected.


STEP 3 Disable filter
If you no longer need your rule, or you need to edit it, go to Settings and click on the Filters tab. This will display a list of all of your filters. To make a change click Edit, and you can change the search criteria and, after you click Continue, what to do when the rules are matched, such as changing who the messages are sent to. If you’d rather delete the filter, just click the Delete link and click OK in the next dialog box.


SEe more :   
How to Download and Install Apps Gmail and Google Calendar on your iPhone

Thứ Ba, 10 tháng 5, 2016

How to Download and Install Apps Gmail and Google Calendar on your iPhone

Below you will find our article show you about the download on your phone.

If you're used to using Gmail and Google Calendar app on your Android device, or even Gmail or Google Calendar in your browser, you may want to install the official Gmail app and the official Google Calendar app are available in the App Store.


Once you’ve installed and opened the Gmail app, you should see an Accounts screen with a list of the Google accounts available on your phone (if any). Tap the slider button to the right of the Google account you want to add to the Gmail app. The slider button turns blue.


If you don’t see the Google account you want, you can add it to the Gmail app manually by tapping “Add account”.


Enter your Gmail email address and password when prompted. Then, the following screen displays telling you that the Gmail app wants to send you notifications when you receive new emails. If you want to receive notifications from the Gmail app, tap “OK” on the dialog. Otherwise, tap “Don’t Allow”.


The first time you open the Gmail app, it wants to tell you about its various features in a tour. If you want to skip the tour and go straight to the app, tap “Go to inbox” in the bottom-left corner of the screen.


The email messages in your inbox for the Gmail account you added (or enabled) displays. Your Gmail account is added to the Gmail app as an IMAP account, which means that any changes you make to your account on your phone is synced with your Gmail account. So, any actions you take, such as messages you receive, messages you file under labels or delete, or messages you send on your phone, are recorded in your Gmail account and you’ll see those changes the next time you log into your Gmail account in a browser or in the Gmail app on another device.


To add other Google accounts you’ve added to your phone to the Gmail app, tap the menu button in the upper-left corner of the screen to access the menu panel. Then, tap the email address at the top of the menu panel.


At the bottom of the menu panel, tap “Manage accounts”.


Tap the slider buttons for any Gmail accounts you want to access in the Gmail app. The slider buttons turn blue for any accounts you activate.


The Google Calendar app is set up in a similar way to the Gmail app. Simply select the Google accounts you want to sync to your phone or add a new account. You can select different ways to view your calendar entries using the menu in the upper-left corner of the screen.


Google also has an app called Inbox that helps you keep your email organized. Some of the features of Inbox include bundling similar messages together, adding reminders to emails you need to get back to, and snoozing emails and reminders until you’re ready to deal with them. There are many other Google apps for iPhone, such as Google Maps, Google Drive, and Google Docs, Sheets, and Slides.

See more :